Sunday, October 26, 2008
Thursday, October 23, 2008
Grappling miniatures ...a creator's angst!

I've been asked to make a few felt pieces in 6cmx6cm dimension but as much as I try to make 'em small, with my present set of tools ... ok, one tool ... I rely on my trusty new sharp scissors to cut out the shapes from the felt pieces. I realised, to cut 'em small is alot harder than to cut 'em big. Like wise, to draw 'em small is alot harder than to draw em big ...
I think I need laser scissors for such intricate specifications if there's such a thing ... and since am on the roll, a template of equally intricate designs and probably a host of other tools and equipment to go with the laser scissors and template! Even a special table or a mat so I won't cut through the floor, the table top ... or what-not am cutting on ... :P
Those triangular textile chalks that we get here, used to draw out patterns aren't much help either. The grip's terrible (its non existent really) ... which leads to clumsy, broad, messy lines. Its either a mess of a pattern or frustrating scratches of odd lines. I daresay, its NOT an effective drawing tool - esp. on felt!
Why can't they make 'em in pencil form where there's better grip and blunt tips can be sharpen ?! Then again, for all I know ... those textile pattern chalks in pencil form do exist ... just, its not sold in Kuching. :p
So what's my alternative? Felt tip pens (no puns intended) -used for writing or architectural designs. Make a mistake and one's felt pieces (not pen) are permanently marred!
I'm soooo sorry K ... this piece has ended up six centimenters high and FIFTEEN centimenters LONG!
Talk about being WAY off the mark ...!
Monday, October 20, 2008
A card in between ...

Having said that, am still happily baking - another hobby on the side of this absorbing fancy of papers and fabrics.
More Felt Creations

Thursday, October 16, 2008
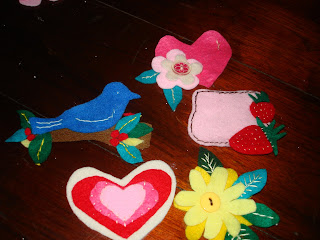
Felt accents


Monday, October 13, 2008
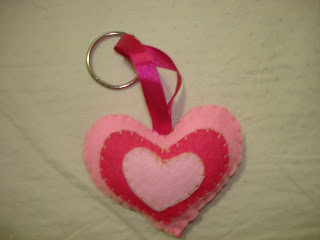
The story of the pink hearts
But one thing lead to another ... and from one pink heart, the creation grew to four various pink hearts of various shade and sizes sewed together with blanket stitch to form a decorative item that can be hung on handbags or even a keyring.
The process began with the idea of sewing a couple of hearts together (the smallest pink and middle darker shade) for a change instead of taking the quick way of gluing the bits together.

Then the thought occured, why not turn it into a kind of keepsake bookmark or a decorative item ... something that can be taken out of card. For that to be, a ribbon simply has to be added. However, after sewing the ribbon to the back of the heart, I realised my sewing wasn't as neat as I hoped it would be and I needed a 'cover up heart'. And so, the fourth heart was added.
It was not until halfway of adhering the fourth heart to the third that I decided to put in the polyster filling to give hearts that extra puffy 'dimension'. 
Felty odds and ends ...

The flower bits are stuck together with good ol' glue. It doesn't have that polished feel of felt flowers from those designer embellishments but i daresay it feels and looks somewhat rustic!
Pink Passion
The other a get well card for a dear family friend. All the pink hearts (its for 'Her') to remind her to 'Take Heart' and get well soon.
Materials used for both cards include:
a) A4 card stocks - 2
b) 12x12 Pink Scratch Cots by Carolees Creation (cut out to size)
c) Ribbons and ric-racs
d) Buttons
e) Fabric and Paper flowers
f) Felt hearts cut out from Felt.
Tuesday, October 7, 2008
Its October ...
Just not been taking pictures of the stuff i've been experimenting with. Mainly because i usually scrap into the small hours of the night and taking pictures in that kind of light with my digital compact just irks me. Pictures taken at that time of the day are either a)blurred b)weirdly hued c)disasterous altogether.
The solution of course is to wait for daylight to take them pictures. But come daytime, there's just so many other things to deal with first and taking pictures of one's handiwork isn't exactly top on the the 'To-do List' - until of course, the hurly burly of the day is done, the dust has settled and one finally has the hours to one self.
The only bits of paper that shapes quite quickly in a few hours are cards!


