Sunday, July 20, 2008

Mauve dots of the week ...

Last weekend, I took the opportunity to visit the 'World Craft Bazaar' that was held alongside the Annual Borneo Rainforest Music Festival. Though in reality there were not quite as many stalls as the term 'World Craft Bazaar' suggests, they did have some pretty nifty hand-made bits - from Indonesian handcrafted fine leather handbags (i guess the fur on bag would appeal to some ....), to exquisitely Korean embroideries and knots, tie dyed silk wraps and pashminas from Gujerat, quirkly felt characters from Kazakhstan to baby rattles and baskets made out of Danish weeds that smelled absolutely lovely, to our local craftworks and souveniers.

I got this from one of local budding beading enthusiast - Qacaq. Which is pronounced as 'Ka-cak' which means covers the range of 'lovelies' (from pretty, handsome, beautiful to yummy ...) in Malay.The shimmering beads were of Swaroski crystals ... not exactly local Borneo-an handcraft. But i couldn't resist how YUMMY or 'Kacak' that piece was.

It also so happened too that an old friend's birthday was around the corner and I found myself musing over the idea of incorporating yummy choker into card layout. Mulled all week. And when i wasn't dreaming out design and concocting layout techniques .... I made cards (as seen in previous posts)

And after much trial and error ... and many pieces of paper shredded to bits ... I decided to be less ambitious in terms of layout (my technical know-how is limited to only so much ..) and stick simply to what 'might' work. Card turned out nothing like my initial scribbling designs.


That's what I came up with ... a mauve taupe piece with polka dots that matched the yummy mauve choker. What's most important is that friend liked it! :)

Friday, July 18, 2008

Baby shower


Made this baby shower card out of out of different types of materials - from manila cardstock, baby present paper to blue floral cloth borders and white felt.

The baby boy 'outfits' for first drawn on felt cloth and then cut out and adhered to card with UHU glue. Decided that all white outfits were looking a little plain (though in real life babies look oh so adorable in white!), so added red glitter glue and bits of blue and red grosgrained ribbons and tiny bits of blue ric-racs (for pocket emphasis) Particularly liked how the rompers turned out with the two blue brads for 'buttons'.

From paper napkins to ...

... Cards!


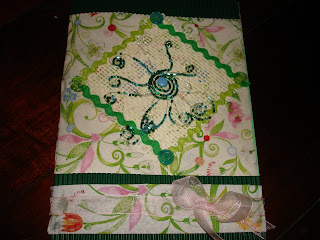
Loved the floral pattern and colours of these fancy paper napkins - decided it would be a waste just to use them as napkins only to have them binned. Its not everyday, one comes across such lovely designs that gives one that 'touch of spring' in Borneo.


Admittedly, I have developed a liking for swirls - reminds me of those lovely green ferns we get in abundance here! Its also something I MUST get from those online scrapbook retailers someday ...


Adhering paper napkin to card is not exactly easy. Its flimsy - making it difficult to cut. The plys tend to separate. The best means of sticking them to cardstock is glue - not just any glue. UHU glue. That's the best i have in stock - in my part of the world, that is. Brads are quite an effective means of sticking napkin to cardstock too - provided napkin doesn't tear.


And so we have it. An experimental mish-mash of various bits of papers put together ... and er, if you're wondering what those swirly bits of beads represent ... its suppose to be a peacock - but it looks more fern like than a bird! :P


And since I still had half the fancy napkin left (waste not want not ...!) and the corrugated cardstock green, I made this ...


Double accordian Album

Got the idea and instructions off Insprational techniques here:- http://insprationaltechniquesandtutorials.blogspot.com/2008/06/double-accordian-album.html

Made my album a little bigger (i.e. 6x6) than the 4x4 double accordian album featured on tutorial page.

Accordian page(s)

Accordian page when folded

D-I-Y Binding

As seen in (my not so well taken pictures) the basic album has been completed. The next stage is the page(s) layout - which is still on going. Its meant to be a gift for a friend - and for once - with subject being a cute little baby girl, I found myself using those lovely complementary girly pinks and greens - without worrying whether pages would be overly girl-ish or sissy ... !

Paper supplies are made out of:-
1. Chipboard backing of drawing block (recycled) to make cover of album
2. 12x12 scrapbook paper by DCWV (?) Premium Stack
3. Green and pink manila card - cut out to size
4. Metal ring binder
5. Ribbons
6. Other bits and pieces of matching present paper from scrap stash

Sunday, July 13, 2008

Card making weekend ...

Had a couple of cards made this week. One for a friend's birthday. Another a thank-you card.


Birthday Card


Materials used for birthday greeting card include-


1. A4 Cardstock paper with pearly sheen
2. A4 red paper (90gsm)
3. Patterned wrapping paper -cut out to design
4. Fibre-like wrapping paper
5. Brads
6. Alphabets rub-ons and chipstock by Queen and Co.
7. Button(s) corners
8. Corrugated paper circle to mount flower
9. Tag - by K & Co


Patterned wrapping paper were cut out in small circles using paper puncher by Carla craft and arranged and glued together to resemble flower. Glued pattern paper to the 'B' and - of chipstock alphabet. Made paper corners out of the same patterned paper - cutting them out in strips and gluing them down. The tag was stuck on with double-double sided tape to give it that 3-D effect.


Inside of card


Since lavender is a personal colour favourite, made a 6x6 'thank-you' card from leftovers of wedding present paper used to make earlier wedding cards. Was careful to use only bits without the printed 'wedding wishes' wordings. This was alot easier to put together. Just alot of picking, arranging and glueing down the various bits.


Thank you card


Paper supplies used are of: -

  • A4 lavender cardstock cut to size
  • A4 off white paper - cut to size
  • Patterned wrapping paper
  • Ribbons
  • Lace border
  • Buttons

Thursday, July 10, 2008

More freebies ...

Am a firm believer that all good things must be shared!

Was browsing through about.com this evening looking for Adobe Photoshop tutorial on how to remedy blurred photos. (My 'sharpening' of image only makes the photo unsightly grainy ... :P) and guess what i stumbled upon ...

Free digital scrapbooking kits!!

The site is:-http://graphicssoft.about.com/od/digitalscrapbooking/ig/Sweetie-Pie-Kit/index.02.htm

Although I've not reached the stage of being able to manipulate images with software e.g. layering, cropping, pasting and what-nots, the stuff given in the kit (you can pick and choose what you like) could come in handy. Like them tags and flower embellishment. The digital scrapping challenged like me would simply print and cut out and paste. And if desire 3D effect, mount the images with padded double sided tape.

Admittedly the images aren't as fancy as the ones you pay for on dedicated digital scrapbooking sites. But for the geographically aand scrapbook resourced challenged (ok, ok, that excuse of being an hour and a half flight away to the nearest scrapbook store is getting weaker as i write with all the development of online scrapbook shops in the country!)

On the flipside though, digital scrapbooking eliminates this scrapper's down-time of having to waiting for stuff ordered online to arrive (sometimes its real SNAIL MAIL service!!) On most times, one runs the risk of having things go missing in the mail. I had the small misfortune of having my felt fusions swirls nicked by a certain postman - i know not who. Pity ... i really looking forward to being able to HOLD, TOUCH and FEEL 'em instead of admiring how pretty and fancy they look in the pictures.

Those digital scrapbook kit eliminates that probability of things go missing.

Go take a peek. You might just find something you like. :)

Monday, July 7, 2008

Paper Kellys ...


Downloaded these paper Kellys from the Hermes website. You can check them out at (not sure how to do a link on blog yet but address is) http://lesailes.hermes.com/na/en/

Its a template where you can print, cut out and paste. Kinda cool ... then again, possibly a 'geeky' way to spend one's last moments of one's weekend. But we do what we like. And what we like helps us relax ... before another hurly-burly of a week begins.

Lined up are my first (white) attempt, my second (red) attempt, and my final (grey) attempt. I had trouble figuring out the the position of 'buckle'. Finally got it 'spot on' when decided not to follow the instructions so closely and be a little flexible on the buckle flap.

Sunday, July 6, 2008

De-mystifiying bits of digital technology ...


I've lamented alot about my photography skills and esp. blaming the lousy photos on camera.

My bad really. The last few days while fiddling with camera, I discovered (lo and behold!) a whole host of features that I hadn't bothered with and relying simply on those 'programmed' or 'automatic' functions that's the easiest to reach.

So taking advantage of the lovely sunny morning (where I discovered makes the best pictures) I set out to explore what my camera can actually do. You know that wanting to achieve the sharp and crisp subject with hazy background ... I *think* I finally figured out how to tweak functions to achieve that effect ... and it obviously doesn't involve the 'multi focus' function ...

Yesterday, I discovered my laptop actually has a memory card slot! :p After FOUR years ... talk about being a 'blur sotong' (calamari)!! And apparently one can create folders camera's memory card and download pictures from different cameras (that's if memory is large enough) ...

Quirkly enough, all this demystifying business would not have taken place had not this determination to figure out Adobe Photoshop ... which lead to fiddling around with camera, which lead to pottering about with computer and discovering potentially useful softwares on computer that didn't know about.

I daresay its an amazing experience to discover that what you need is actually lying in front of nose ... just that one hasn't yet realised nor learnt of its use. Its rather like finally finding the switch to light in room full of useful utitilities and tools!

Woo hoo ...

Gaudy experiments ...


Admitted the colours of paper weren't exactly complementary nor matching (esp. the green!) ... was experimenting with technique rather tha design. So reached out to whatever scrap that was in my box.

An especially pleased with how home-made 3-D 'sakura' flower made out of small cut circles folded and pasted together to form patels. Base patels would have to be made out of thicker paper - of manila card thickness - 120-150gsm (?) mixed with thin pattern paper petals. I imagine the flower would probably turn out even beautifully if those thick designer pattern papers were used. And more petals too, to give it that 'fuller' look.

As for the vines .. they made out of beads an wiring. :) Twirled over pencil to give it that 'twist'.

As for piece with pink flowers and pink bordering - i was experimenting chiefly with layering of papers ... and the use of broad paper ribbons - what were cut up and used as frames.

Friday, July 4, 2008

More lavender cards ...


Since I still have some paper left over from making the last wedding cards thought I'd experiment some more on different layouts and designs.

Personally rather liked the DIY paper flowers accents made out of three types of paper circles - all made easy by the circular cutter tool by EK Success, and matching brads.

Papers are of :-
a) lavender cardstock like hue
b) printed lavender wedding present paper (cut into desired bits)
c) brads
d) lavender coloured flower lace borders
e) lavender buttons
f) complementary light blue butterfly sticker (ran out of those nice sparkly ones ...)

Also made envelope from same present paper. Instead of glueing the flap down, I inserted ribbon to tie flap close.

Thursday, July 3, 2008

The ironies of technology ...

Today, I decided to tackle that Adobe Photoshop program which I read alot about in those digital scrapbooking page but have yet mustered the nerve to master all the features. My know-how of photoshop is very rudimentary. To open and close a jpeg. file. Ask me to edit ... sharpen my image, add accents or texts and I'd be bewilderingly and ignorantly LOST!

However, those 'how to' videos on About.com on how to use some of the features on Adobe Photoshop CS2 has since shed some light on that rather intimidating Photoshop program - that's been long occupying space in my hard drive - yet hardly ever used. Admittedly, features are still a little foreign to me ... and alot of what am able to do are more lucky stabs in the dark ... ask me to repeat the steps and I'd be somewhat clueless.

What I've discovered however, all that graphics work on computer slows it down dramatically. I half expect to see my nails grow at th rate those image layers take effect!! In the long run, that can be downright frustrating and that's not something one looks for in any hobby!

Ironically, traditional scrapbooking still affords greater productivity than true blue digital scrapbooking. Instead of WAITING and staring at the bottom of computer willing those images to load and take effect in the quickest time possible or making many uncertain pointing and clicking and undo-ing; traditional/hybrid scrapbooking gives me the freedom of browsing through those precious stash of paper, printing out bits while leisurely flipping through scrapbook magazines, organizing those assortment of embellishments and accents, talk on the phone, check my email, do a facial, bake a cake - all in the same amount of time I use twiddling with Photoshop and its Elements!

I suppose, with my present state of equipment (this cranky 4 year old computer), hybrid and traditional scrapbooking is possibly the most suitable for me, that is. Now with the few local online scrap shops that's sprouted in the country, lamenting about exhorbitant shipping charges no longer applies.

Am not going to give up on mastering Photoshop just yet. I'd probably give it another go now and then. But am not convinced just yet on making that total transition to digital scrapbooking - although I absolutely LOVE the stuff those very talented people on those digital scrapbookig forums have come up with!

Tuesday, July 1, 2008

Pot Shots ...

An over exposed shot of footprints in the sand ...?
twilight - under exposed ...?

pebbles in twillight - an out of focused shot


sandcastle kit in the afternoon sun ...


Had ample opportunities to practice photography skills over beach weekend. Photos were ... not exactly something to rave on about :p. Objects were off focus inspite of more than ample lighting. Wanted that SLR quality - you know, sharp object and hazy background. Instead i got quite the opposite effect :p And honestly, I haven't much of a clue on how to get my equipment to achieve the desired results ... inspite of the many attempts at tweaking at my already very 'idiot proof' camera ... ! (Maybe a toss in the sea might help ... photographer included)

Found myself wistfully wondering if i were to invest in a camera upgrade would my photos turn out 'better', 'sharper' 'crisper ' (if there's such a word ..). Didn't help when there were more than a few SLR toting photographers taking pictures of their moments in the sand ...

That's just my feeble excuses ... shifting blame on equipment instead of my lack of skills ...
Honestly, at my rate no superly SLR, blur- proof-camera (if any exists) is going to compensate for my rather clumsy attempts at capturing that one (preferably many many) superb picture ...

Now if i could only figure out how to work that mind -oggling Adobe Photoshop, maybe ... just maybe i could turn my out-of-focus, under or over exposed shots into masterpieces ...